Saturday, February 21, 2015

Life improvements: problem solving on a Saturday and homemade instant oatmeal packets

I woke up this morning at 6:20 and had already solved a problem:


This is an overdue notice from my library telling me that I have items overdue. 

Now, how is this problem solving, you might ask? Well, I *hadn't* received a reminder notice informing me a few days before the items were due that the due date was approaching. I haven't received any email from my library since we switched ILS systems 18 months ago.  I was told in meetings with IT support that this issue is because some internet service providers view the email as spam and do not accept it. So, vendor issue, not ours.

Well, this explanation of things *seemed* reasonable at first, I also couldn't stand that it was true, and it's a terrible explanation from a customer service stand point. "It's Google's fault" doesn't seem like a good stance to take officially for any organization. And just because I had an explanation didn't keep me from continuing to complain. A lot. To anyone that had ears.

And one of my ear-having friends/coworkers expressed surprise that I wasn't getting my notifications through Gmail, since she has since the switchover. "Huh," I said, while on the phone with her. "Huh." And I just couldn't stand the idea that somehow Gmail liked my friend better than me, and I decided to see if it were just possible that the error was on my library's side and not Google's.

And it was. In our new system, there are two address fields for customers. And then a toggle that selects which address field is considered the primary address. My Gmail address and all the test email addresses that IT had placed in my account to see *why* I wasn't getting any emails, were placed in Address 1. Address 2 contained my home address.

And Address 2 had been selected as my primary address.  So of course, no email notifications would be sent because the system wasn't seeing them as there.

*Head desk*

So, I have solved a problem at 6:20 on a Saturday morning.

------------------***************************------------------

Oatmeal. Wonderful, delicious, nutritious oatmeal. 

I've been eating the stuff daily for nearly a year now, as it is touted as having super health benefits for breast-feeding mothers. Plus, you know, good. I've been fine making and flavoring my own oatmeal every morning, and every morning being a little disappointed in my oatmeal. Because it never tastes as yummy as those packets of instant oatmeal do.  You know, the ones full of chemicals and flavorings and things that don't exist in nature?


Also, my brain doesn't really fully engage itself until about 7:00 in the morning, roughly 3 hours after I get up and make my oatmeal. Often when I'm making my oatmeal, I'm not actually measuring out anything correctly and just sort of dumping out ingredients in a sort of, "Eh, that looks right," kind of way. Sometimes the result is not so good. Sometimes it's disgusting.

Problem that needed solving.

As Nate said just yesterday, someone has probably already found a solution to your problem and posted it online. Probably in a blog. And they had.

Kudos have to go to these two sources: 


(Shares the secret to good instant oatmeal, which is that some of the oats are blended down into a powder)


(Good source for the other types of things to put into oatmeal to make it wonderful)

Basically, my solution combines the two sites for something magical.

DIY Life Hack Instant Oatmeal Packets That You Can Feel Good About Eating

What you need:
10 cups instant/minute oatmeal
Instant powdered milk (makes it creamy - don't skip!)
Sugar of your choice (I like brown sugar)
Salt
Spices
Nuts, dried fruit, freeze-dried fruit, other mix-ins
Chia seeds and Oat bran (optional, but makes for a healthier oatmeal)
Little snack baggies
Sharpie
Pull out 3 cups of instant oatmeal and place in blender. Blend until you've made a fine powder. Mix the powdered oatmeal back with the 7 cups of regular oats.
Add the following ingredients/amounts to each little baggie (I end up 18-20):
1/3 cup oats
2 teaspoons powdered milk
1 tablespoon sugar
Pinch of salt
1/8 teaspoon spices
2 teaspoons oat bran (optional)
1 teaspoon chia seeds (optional)
Then add whatever mix-ins you like. I just added what looked like a good amount, but if I measured it, I would probably add no more than 1/8 cup of anything and no more than 1/4 cup total mix-ins.
Seal your baggies and label with their flavors.
When you're ready to eat, pour into a bowl, add 2/3 cup hot/boiling water and enjoy!

My flavor combinations:
Cinnamon raisin
Strawberry walnut 
Cranberry walnut
Choc-Strawberry (added 1 tablespoon powdered chocolate)
Ginger walnut (candied ginger pieces)
Strawberry nutmeg

I used freeze-dried strawberries and they are the BEST. Invest in these. They make your oatmeal. 


Tuesday, August 26, 2014

Soldering a New Outdoor Spigot

The outdoor faucet at the front of the house started leaking a couple months ago, just a slow drip, but continuous.  Additionally, the copper tube section leading to it has been sort of twisted ever since we moved in (certainly the result of someone over-torquing against it), which bothered me but didn't seem to be causing any problem.  This photo shows both a drip and the twist very clearly.


After ignoring it for a while, I decided to look into repairing it. I have taken off quite a few old soldered valves inside the house, but I have always replaced them with valves that have compression fittings. This was different because I was going to have to remove the twisted copper pipe and replace it with a new pipe, so in lieu of replacing the tee and possibly more parts, soldering was the only real option.

So as I often do, I went to the Internet and found some simple instructions on eHow. This guy's video told me everything I really needed to know.

http://www.ehow.com/video_4767454_sweat-copper-pipe-fittings.html

I already had a propane torch and standard tools, but I bought the new parts, plus a wire tubing brush and lead-free flux and solder.  I have cut copper pipe with a hack saw before with good results (just have to be very careful not to crush it), so I didn't buy a pipe cutter.  Here are all the assembled parts and tools.


The original spigot was soldered onto the copper pipe directly with the threads on the outside.  I bought an adapter so that the new spigot could be removed and replaced without soldering if it begins to leak.


Soldering the adapter onto the tube was really easy.  Since I had the spigot attached to it (giving me something to hold onto), the spigot got pretty hot and the paint on the handle bubbled a bit.  But since the spigot is threaded on, I can just unscrew to replace it if it wears out faster from getting too hot.


Next came the really difficult part, removing the old spigot.  If you watched the video, you will remember that you want everything to be dry so that you can get the parts hot enough.  This turned out to be really important, and it also turned out to be impossible, because the main valve below the tee was also leaking very slowly.  So I had a slow drip coming out of the spigot.

If you imagine a pot of water heating on a stove top, when you get the pot and the water to 212 ºF, the water boils off as steam.  Since there is only a certain amount of water in the pot, when it all boils off, the pot quickly gets hotter than 212 ºF if enough heat is being applied.  In this case, I essentially had an unlimited pot of water.  When the temperature got hot enough, it boiled out of the spigot, but there was more cool water filling the tee from behind because it was leaking through the valve below.  Water has a tremendous heat capacity (unlike metals), so it takes a lot of heat to raise the temperature of water.  This is the concept behind things like automobile radiators; just keep running cool water through your engine and it will not overheat.  But since I was trying to get the soldered joint up to 350 - 840 ºF (probably closer to the high end of that range) and the trickle of water was trying to keep it down around 212 ºF, I simply could not make enough headway to melt the old solder.


So I went to the main valve by the street and closed it also, then I bled out the pressure from the valve below the tee.  And it still leaked.  The leak was much slower, so I tried again with the torch.  I adjusted the flame and moved it around to try to apply the strongest possible heat to the joint.  After a while, I could tell that it was finally about to start melting because a stray speck of solder on the surface of the pipe turned silvery.  So I kept at it and used my adjustable pliers to try to twist the spigot free.  The spigot actually came free from the tube before the tube came free from the tee, even though I was applying heat directly to the spot where the tube met the tee.  I had a brief moment of anxiety that I wouldn't be able to remove the tube from the tee without damaging the tee and creating a bigger job, but it eventually twisted free also.

The total time spent on removing the old spigot and tube was probably close to an hour, which accounted for the bulk of the job.  I was fairly surprised that I never ran out of propane.


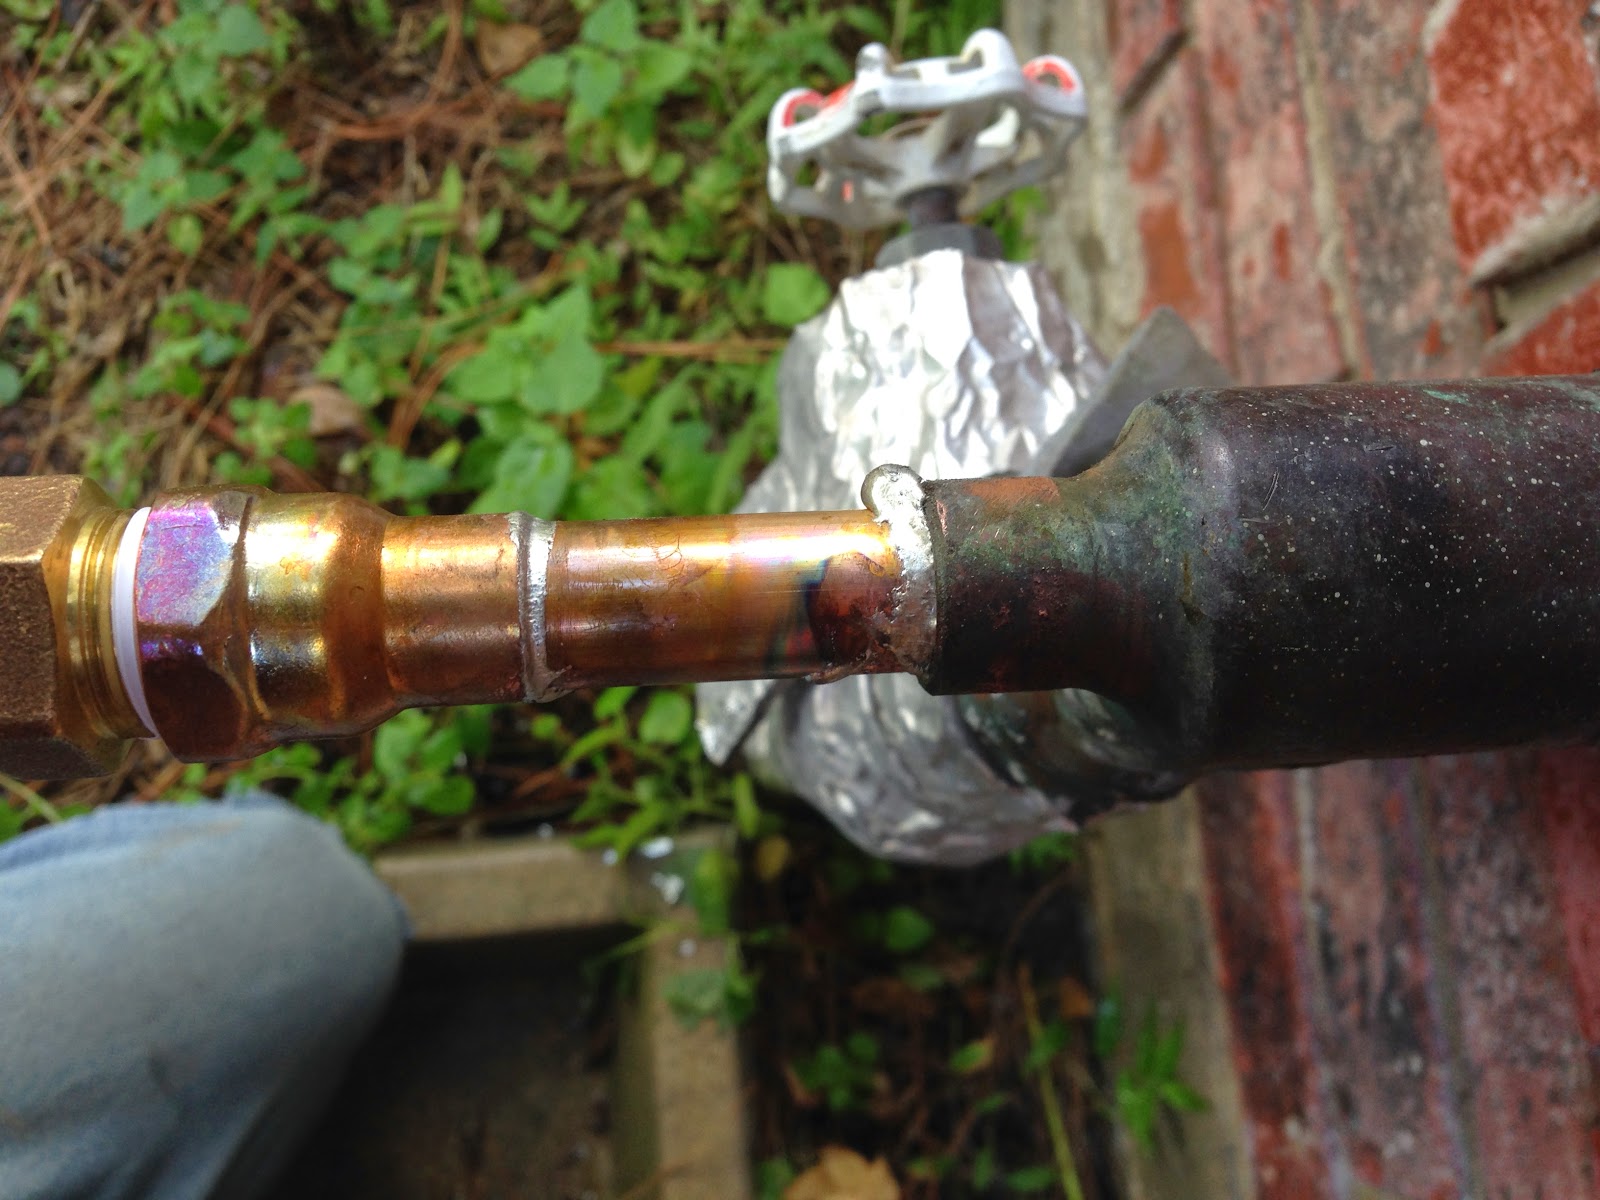
The last step was to solder the new tube into the tee.  There was still a slow drip of water to complicate matters, and I was only able to apply the flux to the tube and not the tee, which was too wet inside, so I made sure there was plenty of flux on the tube.  With my recent practice at using the flame with high effectiveness, the soldering wasn't as bad as the removal had been, although it did take a bit longer than the dry soldering I had done earlier.  Since I was barely able to get to the temperature I needed, the final result was also much less even and clean.  You can see some beads of solder that fell onto the concrete drip catcher below the assembly.


But it does the two things it is supposed to do: it doesn't leak, and it holds the pipe together.  So the solder definitely worked its way into the joint.  So far, so good!  And now I know how to solder a copper pipe, and I have learned the importance of working with dry parts.


Saturday, February 15, 2014

Debra's Dream Leg

In the mid-1980's, Lynn Williams, my father, sculpted a larger-than-life 5-piece fragmented female body in stoneware.  It included a head, a torso, a leg, a partial leg with hands grasping it, and a thigh with a forearm across it.  The complete work was titled "Debra's Dream" because it was based on a dream that his sister had described to him.  In the dream, the subject was separated into pieces and scattered in a landscape, with feelings of being lost, trapped, and broken.

The pieces are all very thick and sturdy, with networks of support structures running along their inside surfaces.  The limiting factor in their size was the size of the kiln that had to hold them for firing; the head and torso were both about as large as could possibly fit.  These pieces have also spent some time outdoors, and they are virtually weatherproof.

The sculpture was displayed in its intended form for a period at Uptown Gallery, my parents' business in Eureka Springs, Arkansas.  The pieces were set onto wooden pedestals with a thin layer of sand.  The two legs stood together, one standing on the sand, and the second buried midway up the calf.  I may be able to add photos of this display at some point in the future.

When Lynn passed last year, I came into possession of "Debra's Dream," minus the head.  I believe the head must have been sold separately (if you know who owns the head, I would like to find out!).  In the photo below, the four remaining pieces are on the floor.

Three of the pieces have elegant standing positions as-is (the torso and the leg with hands both stand upside down).  In the pictures below, you can see how we have displayed the leg with hands and the thigh and forearm on a shelf next to the stairway.  Currently there are Christmas lights, but in the future we intend to install track lighting above the stairs.


The fourth piece, the full leg, with its angled foot, needed additional support to be displayed in a standing position.  In the gallery, it was held by an internal wooden pole (a broomstick, I think) that was inserted into the pedestal.  So my concept was to make a very simple base that holds the leg upright with a rod.  The hole in the foot is exactly the right size to fit a 2 x 4 board at an angle slightly off perpendicular to the ground.  So with a little measurement and a little trial and error, I cut a piece of 2 x 4 at the correct angle and bolted it securely to a 24 x 24 inch piece of thick plywood.  Then I cut a piece of threaded steel rod to fit as high into the leg as possible and drilled a hole in the 2 x 4 at a steep angle (again partially measured and partially guessed because it is very difficult to judge the exact angle of the rod inside of the leg).  I used threaded rod because I had initially envisioned screwing it into the 2 x 4 for a tight fit, but in practice it was actually easier to give it a loose fit as long as the hole in the 2 x 4 was deep enough to hold it securely.  Below are pictures of the assembled base with and without the leg.


In order to determine that the base was going to provide good enough support and not slowly bend or separate, I left the leg standing on it for a couple of weeks.


After proving to myself that it would work, it was time to finish the base.  I got out the jigsaw and cut out an oblong shape that I had drawn freehand.  The longest part of the base points in the direction that the leg leans, in order to make it as stable as possible with a small footprint (ha ha).


Next I used a coarse grain sandpaper to smooth and round the top edge around the base.  I did not bother with a finer sandpaper because the plywood has some deep wood grain that was going to stay regardless, and I planned to paint the board.  I really just wanted to get rid of the sharp edge and leave an otherwise natural look to the surface.


Next it was time to spray paint.  This photo is after one or two coats.

Here is the final base with the rod inserted.  See how nice that wood grain looks?


And here is the final piece from multiple angles.


From the top you can see how the lean matches the shape of the base.  The center of gravity is well within the area covered by the base.  The sculpture thus gives the illusion of leaning too far but it does not try to tip over.

 Thanks for looking!

Sunday, February 24, 2013

Lamp Re-do

I decided last weekend when I was at the Target in Pasadena (after a couple of margaritas at Chipotle) that I wanted new lamps. I bought these pretty teal ones and brought them home and they were way too small.

So I returned them. After discussing what Nate liked about his current lamp, we decided to try refinishing his lamp instead of replacing. But I wanted semi matching lamps, so we needed to find another lamp similar to Nate's. On Saturday, Nate and I went shopping.
Nate's lamp
 We went to the ICM Resale shop and found a lamp for 3 dollars. We picked it up and then went to Lowe's for spray paint.


New lamp (in front) with old lamp, all taped up.
Then we painted and lacquered. Ta-da!

My new lamp.

Nate's refinished lamp.

Total money - $15.
Total time - 2 hours (including time shopping)


Monday, January 7, 2013

Island Construction: Part 4

Weekend 2 of this crazy project brought great progress.


We cut out the beadboard for the two sides and placed it. The other side is the mirror image, just without an outlet.


Nate constructed a rough counter surface for us to work with.


And the painting began in earnest!


This looks like prison chic! 


It's starting to look like more of a cohesive whole!


Tuesday, January 1, 2013

Island Construction: Part 3 (was Island Demolition)

After raising the cabinets, we then needed to connect everything. 


We had to place the new outlet a little off-center, but there was no helping it. 


We secured the cabinets to four-by-four posts, then the posts to the original structure. Then we secured the bookcases to the original structure, with additional four-by-four posts to help support the weight.

Monday, December 31, 2012

Island Demolition: Part 2

Day 2 and 3 are mixed in here: there's been less overall change, but still lots of work.

Nate removed the last of the old frame. We're going to reuse the section at the back.


Holy crap is that live wire dangerous looking! We've taped it, but still have to watch Jill.

We spent a bunch of time spray painting the new cabinets. I think from here on out we'll paint by hand.


We decided to place everything to make sure our idea would actually work.


If it didn't, I'm not sure what we would have done.


But it does! (If you've got a good imagination)


While I was busy painting, Nate built risers for the cabinets. The cabinets are 1.5 inches shorter than the bookcases, so we needed to bring the cabinets up. Nate used 2x4s for the frames.


Nate then fed the electrical wire through the riser. We'll be able to hide it entirely!


At this point, we placed everything again, and marked the linoleum about an inch further out all around the island base. We're adding baseboard to the bottom of the island, which is 3/4 of an inch thick, plus we want a little extra, so when the rest of the linoleum gets removed in a few months in favor of tile, the workers won't have to ding our new island (hopefully!).

Nate used a utility knife to slice the linoleum, and then pulled!


 It took a little bit of time to clean up the cement, but my parents had lent us a tool to help. While I cleaned the cement, Nate worked on installing the new beadboard backings to the bookcases.

Thankfully, my grandparents had bought us a new tool bit set for Christmas. We used up two bits making the holes!


There's a bookcase with a new beadboard back! We're continuing to make progress; expect more photos soon.