Showing posts with label bathroom. Show all posts

Monday, March 30, 2009

Project 5: Fix the upstairs bath, Part III

Another project begun during my family's recent visit was removing the old vanity bar of lights from the upstairs bathroom and installing two new lights in its place. The old lights was removed, and a larger hole was cut so that we could better access the original electrical box, and then two smaller holes were made at equal points away from the original hole, and two "old work" boxes were installed.

My grandparents, mom, and N worked on connecting the old wiring to the new, and later that week N and I installed the light fixtures and I began to patch the drywall. N actually cut the piece, and then I glued it in place and began to mud it. It's funny, because since then I've patched two other holes (one in the blue bedroom, the other in the closet of the orange bedroom), so it's been wonderful to know how to fix the wall when it's damaged.


We still have a lot of work to do in the upstairs bathroom, but we're putting it on hold for a while to consider what we'd like for the cabinets/sinks/etc.

Thursday, March 19, 2009

Project 1: Redo the Half-bath, Part VIII - FINISHED

My Kentucky grandparents came down with my mom, dad, and sister during the last weekend in February. N and I had worked on the bathroom to the extent of our abilities, and needed help with the plumbing and final touches.

My mother installed the baseboards in the bathroom while everyone else worked on the cabinet, which needed a notch carved out because of a pipe that runs up and out of the sink wall. Eventually the cabinet was installed, the sink was placed on, and the plumbing was completed.

The mirror for the bathroom was installed by my mom, followed by the toilet paper holder, and towel bar. N and I installed the soap dish and shelf the following weekend. There was so much going on that weekend that the final two pieces of baseboard had to be cut, and then glued into place on the wall. I dapped everything up (so much fun! Buy some DAP!), and then painted over the small marks on the walls from installing the hardware.

My mom had bought us a blue towel from Target a couple of months ago on clearance, and we decided to use that along with a picture that was given to us at Christmas. It's got a lot of color, so it contrasts well with the lightness of the room.

I picked out some nice bar soap and pump soap for guests, placed a box of Kleenex in the bathroom, and now people can use this bathroom!


Minor task(s) to complete:
  • Repaint the molding around the door and repaint the door itself.
  • I'm sure that there's something else I'm forgetting, but I'm just so happy with how it looks as of now.

Monday, February 2, 2009

Project 5: Fix the Upstairs Bath, Part II

In the second part of Project 4 I explained how my parents framed and patched the hole from the door that N and I removed a few weeks ago. In the bathroom we decided to buy beadboard to reduce the amount of wall space we would have to repair, texture, and paint.

The drywall installed:


The beadboard installed:


After my dad used the mortar to lay the tile in the half-bath, we came upstairs and removed the tile that was broken. Upon second inspection, the tile found in the upstairs bathroom cabinet did not match the tile in the bathroom. The tile left by McVicker was more peachy in color. One must assume that McV never knew that two boxes full of the correct bathroom tiles lay in the garage. Oh, boy.

McVicker's Tile:


The correct tile:


The two side by side (correct tile is on the left). Notice that the McVicker tile is smaller than the correct tile.


My dad cut off a nail head that probably made the tile uneven in the first place, and then laid down a new tile. Sunday morning before they left my dad mixed up a small amount of grout, and then my mom demonstrated how to grout on the single tile in the upstairs bathroom.


Also discovered in the bathroom this weekend: a plastic bag full of light bulbs for fans. Along with the receipt of purchase from the former Mrs. McV.

When we bought the beadboard we also bought chairrail to go on the top, and baseboard to go along this wall. I will paint the baseboard later, and N and I still have to install the remaining 12" of beadboard before we can nail in the chairrail. We also need to mark above the studs we found in the wall when installing the beadboard to make installing the chairrail easier.

While we were up in that bathroom for an extended period of time I noticed that the door of this bathroom (and some of the other upstairs doors) has been repainted - in places. I'm not sure it shows up much in this picture, but it looks like someone decided to use up a little bit of paint by painting certain parts of the door a brighter white. But it's been poorly done and I almost wonder if this was a trick that either the Wards or McVicker tried to pull in order to make the house look better for showing. At first glance it's hard to notice, but once seen, it is not forgotten.


The right hand side of the patched wall still needs to be built up some. When it is completely built-up and sanded, we intend to retexture the entire wall (and perhaps entire bathroom, minus behind the giant mirror). Overall, though, we are very happy with how things are shaping up! Doesn't the bathroom look much longer now?

Monday, January 26, 2009

Project 5: Fix the upstairs bath

The second full bath is located upstairs between the second and third bedrooms. The bathroom shared a door with the second bedroom, but the door and the frame of the door were recently torn out of the wall:


Besides the ugly cabinets, sinks, faucets, mirrors, and light fixtures...wait, is there actually anything good about this bathroom?

The tub is decent, and is draining better than it used to, although we would prefer that it wasn't so slow. The toilet isn't in as good of shape as the downstairs toilets. However, the floor of this bathroom was tiled with the same tile as in the master bath and half-bath. A tile near the toilet is loose, and the materials needed to repair it were found underneath the second sink. It appears that McVicker thought about fixing this problem, but then laziness overtook his good impulse. Also, this room isn't currently painted any real color, which will make painting it easier, and I appreciate the fact that the wallpaper I suspect used to mar this room is now gone and we didn't have to do the work ourselves.

Once the wall where the door was is filled in, N and I are thinking of adding bead board to hide most of the wall, as well as replacing the baseboard in this room and the bedroom, since new baseboard will be needed to go along where the door was previously.

We have bought the color of paint for this room: Valspar's Temptation in flat enamel. The ceiling in this room was repainted a true white (as noted in the description of Project 4). Financially we have to postpone any further renovations until later in the year. We have replacement light fixtures that my mom gave us, and will consider what type of mirrors and vanities we would like to install in the future. We still have 90% of our fence to replace, as well as new carpet sometime this year, and those are priorities.

The upstairs bathroom, picture from the real estate brochure:


The sinks are the same as what was in the half-bath downstairs. This bathroom features a cultured marble counter/sinks, and faucets that one can still buy at Lowe's for $14.99. Both of the sinks have a slow drip that is causing a calcium/iron/whatever build up on the hardware. Anyway, here's one of the nasty-looking sinks:


The broken tile:


Whenever we can replace the vanity in this bathroom I would like to, if only to make accessing the toilet tank easier:


Isn't that a great design?

Sunday, January 11, 2009

Project 1: Redo the Half-bath

So, the half bathroom was decorated with one of the most hideous wallpaper designs ever. A sort-of mauve-y pink with tiny blue and white flower designs. The ceiling was painted a cream color with a high gloss finish. As with most of the house we found a screw in the wall that had previously held a wall hanging of some sort (I believe it was flowery as well). I'm not sure what the previous owners had against traditional nails, but I'm not sure I've ever found a nail in the wall - it's always screws. The light fixture is one of those vanity lights that were so popular in eighties homes. I actually don't mind these lights when there's a source of natural light as well, as in the master bath, but for bathroom under the stairs, vanity lights are too much and too ugly. The rest of the fixtures and mirror are cheap and ugly, but not offensive. Finally, the door to the room does not open properly - one must go down the hallway beyond the door in order to open the door, and the lightswitch is placed so that it is difficult to locate.

This is the first real project that we're undertaking without the intervention of a hurricane. This is also the only downstairs room that is undeniably hideous. N suggested that we delay work on the library (which is the project I'm most interested in) in order to fix the public bathroom downstairs, and I admit that it makes sense.

First, the wall fixtures had to come down. The towel rack and mirror came down easily. The toilet paper holder, however, caused the first real problem. The screw heads had rusted through, so that at the first application of a screwdriver the head was stripped. N eventually cut off the holder using a Dremel bit, and then pulled the rest of the screw out of the wall. The toilet tank came off easily compared with the toilet paper holder.

Then I began to remove the wall paper. I began on the far wall, which unfortunately had been papered over twice, with the second layer almost directly on top of the first. Both layers are the same pink design, so as my mom suggested, it seems someone was unhappy with the first application, so they papered over it. The walls of the bathroom were not painted before application, although the majority of the wallpaper came off without the use of DIF. A few areas of the wallpaper have been more difficult to remove, and I continue to pick away at them.


N removed the door between the second bedroom and bathroom upstairs in anticipation of that project, and brought it down to see if it would work to replace the half-bathroom's current door. We have the door handle, mirror, shelf, soap shelf, towel rack and toilet paper holder already selected, thanks to my great mom. We still need to select a color (although we like yellow) and look at light fixtures and perhaps a new sink and cabinet. We considered switching to low-flow toilets for the public bathrooms, but decided against it after remembering an experience in a hotel room that we shared with friends that involved a low-flow toilet. For our master bathroom, a water-conserving toilet will be appropriate; for general public use, however, the old toilet will suffice.

Detail of the wallpaper:


More pictures of the vanity, light fixture, and where the mirror used to be screwed to the wall:


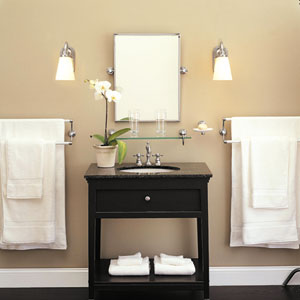
Our new accessories are from Restoration Hardware, the Eaton collection. Here's the only good picture I could find of the hardware, although it shows the faucet and lights, which we weren't able to buy from the same collection. Anyway, it's the feel of the hardware that this picture shows: